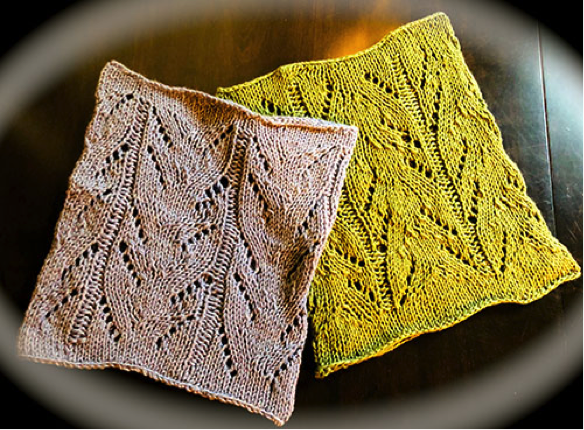
November Cowl

The November Cowl was inspired by the cooler weather we experience in Steamboat Springs, Colorado, U.S.A. It is a fast knit project worked bottom-up, in the round over 17 stitches on 20 rows repeat. The pattern is very easy to follow and you will want to keep knitting. Thus, the November Cowl is very appropriate for the cold month of November, plus it will make a great handmade gift for the Holidays!
Materials-
Yarn: 100% Cashmere DK weight by Lux Adorna Knits
Yardage requirements: 140 yards/ 128 meters (1 skein)
Needle: US7/ 4.5mm 16” circular knitting needle
Other: Stitch marker; darning/tapestry needle
Finished size-
Approximately 10 inches wide (it will stretch more) and 11.5 inches long after blocking
Abbreviations-
k = knit
p = purl
st(s)= stitch(es)
yo = yarn over
k2tog = knit two together
ssk = slip slip knit
rnd(s) = round(s)
rep = repeat
* = repeat

Pattern-
Cast on 85 stitches using a long-tail method. Join work, be careful not to twist, place marker for beginning of round.
Knit in the round for 5 rows.
Begin working the 17 stitches pattern over 20 rows.
Rnd 1: *P1, k12, k2tog, yo, k1, p1; repeat from the * across.
Rnd 2: *P1, yo, k2, k2tog, k11, p1; repeat from the * across.
Rnd 3: *P1, k10, k2tog, k1, yo, k2, p1; repeat from the * across.
Rnd 4: *P1, k1, yo, k3, k2tog, k9, p1; repeat from the * across.
Rnd 5: *P1, k8, k2tog, k2, yo, k3, k1; repeat from the * across.
Rnd 6: *P1, k2, yo, k4, k2tog, k7, p1; repeat from the * across.
Rnd 7: *P1, k6, k2tog, k3, yo, k4, p1; repeat from the * across.
Rnd 8: *P1, k3, yo, k5, k2tog, k5, p1; repeat from the * across.
Rnd 9: *P1, k4, k2tog, k4, yo, k5, p1; repeat from the * across.
Rnd 10: *P1, k4, yo, k6, k2tog, k3, p1; repeat from the * across.
Rnd 11: *P1, k1, yo, ssk, k12, p1; repeat from the * across.
Rnd 12: *P1, k11, ssk, k2, yo, k1; repeat from the * across.
Rnd 13: *P1, k2, yo, k1, ssk, k10, p1; repeat from the * across.
Rnd 14: *P1, k9, ssk, k3, yo, k1, p1; repeat from the * across.
Rnd 15: *P1, k3, yo, k2, ssk, k8, p1; repeat from the * across.
Rnd 16: *P1, k7, ssk, k4, yo, k2, p1; repeat from the * across.
Rnd 17: *P1, k4, yo, k3, ssk, k6, p1; repeat from the * across.
Rnd 18: *P1 , k5, ssk, k5, yo, k3, p1; repeat from the * across.
Rnd 19: *P1, k5, yo, k4, ssk, k4, p1; repeat from the * across.
Rnd 20: *P1, k3, ssk, k6, yo, k4, p1; repeat from the * across.
Repeat round 1-20 one more time. Then, repeat round 1-10.
Knit 5 rows.
Bind off loosely. Enjoy the November Cowl!
Happy Knitting!

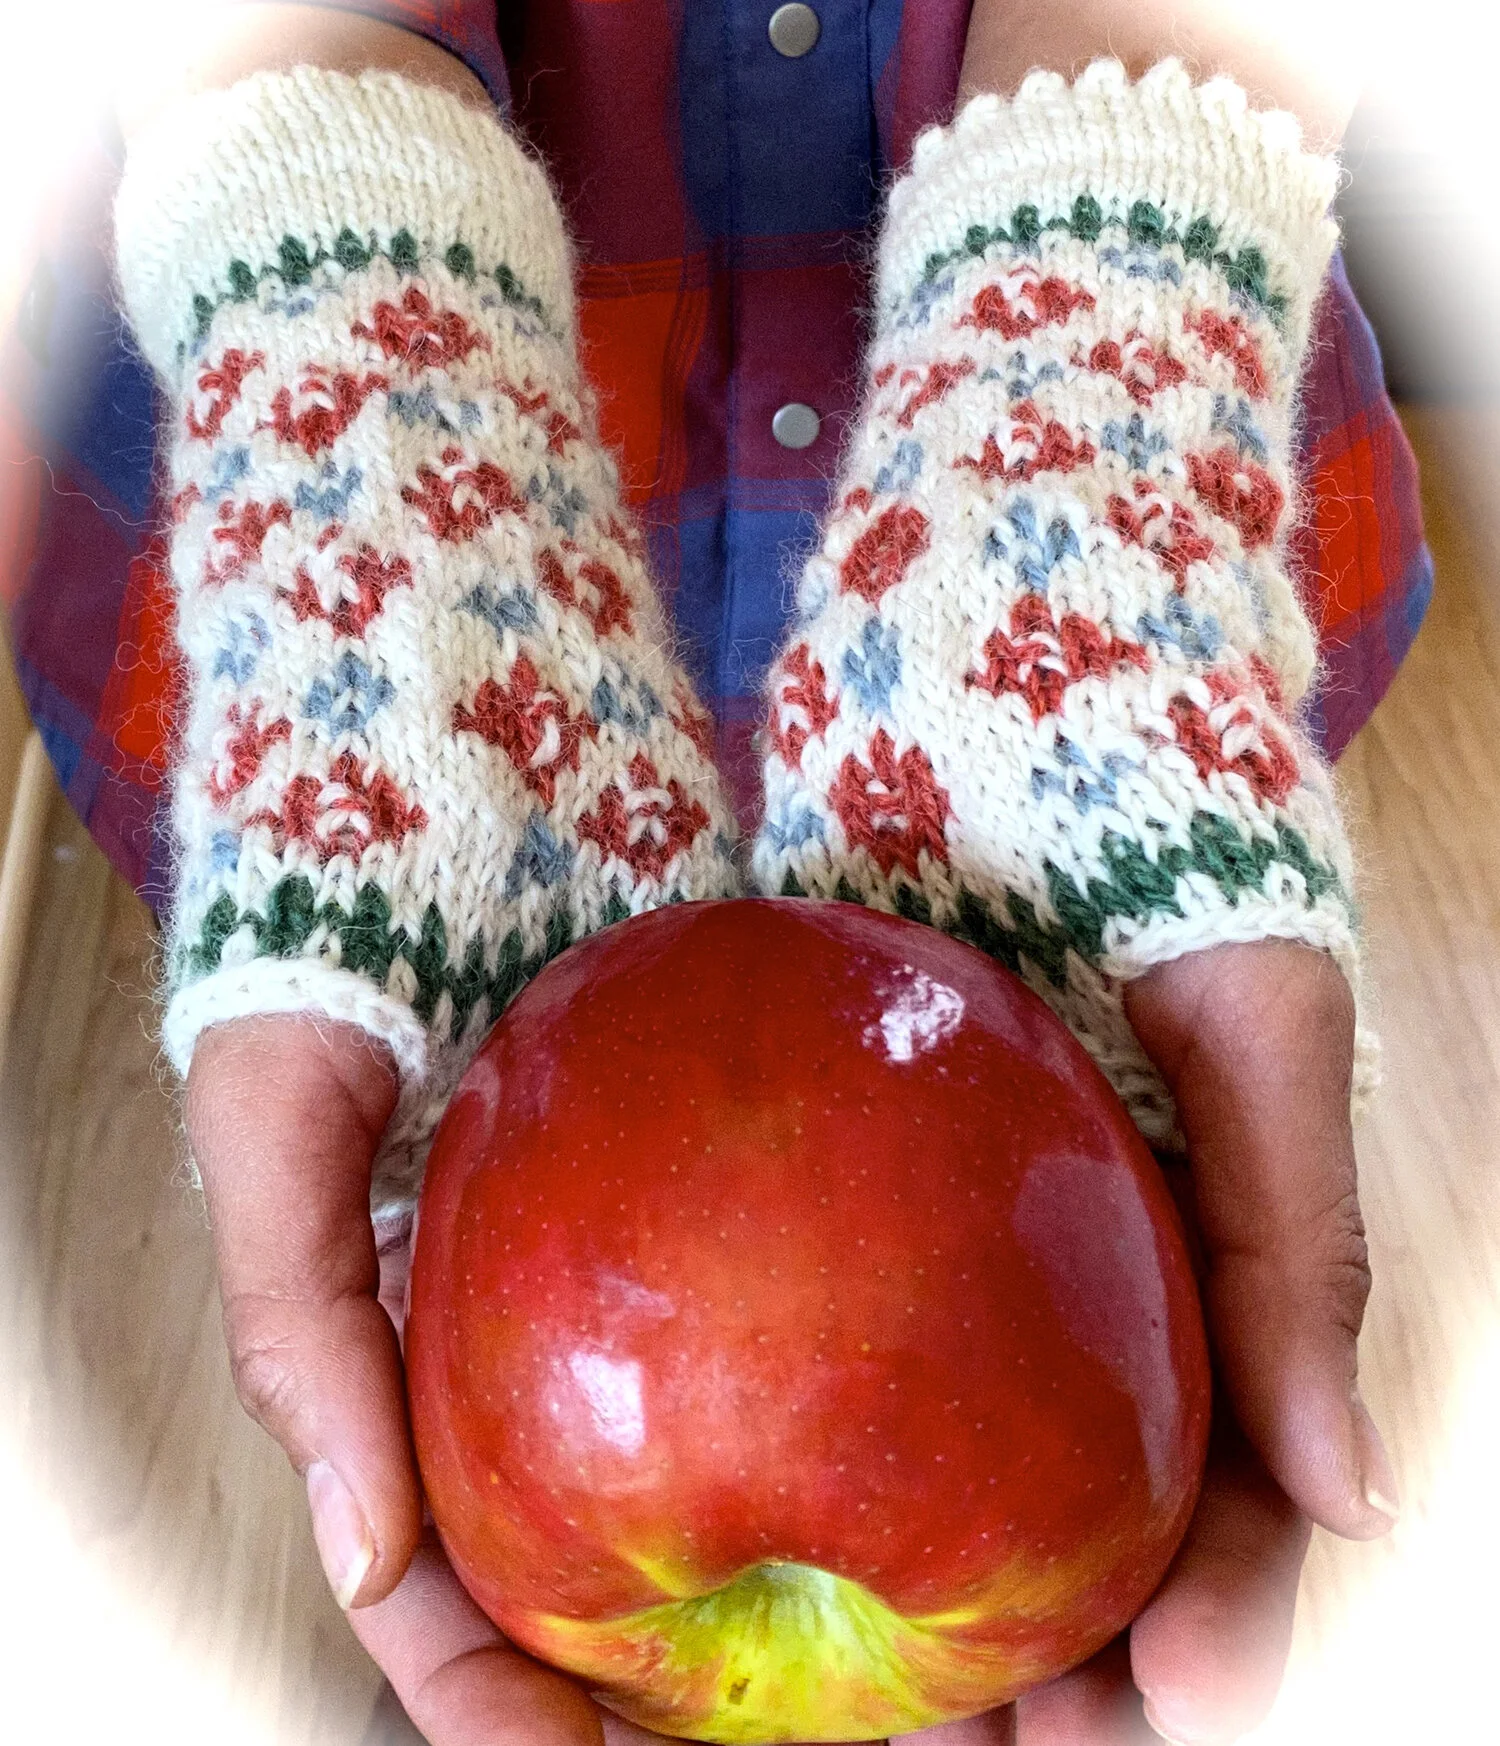
Sweet Cassie Fingerless Mittens
by Cho Tin Tun Kirkpatrick for Cho’s Designs
Greetings friends! I present you the Sweet Cassie fingerless mittens, a perfect texting mitts that is fun to knit and own during the time of social distancing. Our family has been on a lockdown since March 17th. During this time, I promised myself to stay positive, productive, and learn new skills. I try to have a routine everyday for chores as well as creative work. The Sweet Cassie fingerless mitts are the result of my love for colorwork.
The thought of colorful fiber really excites me! Since I have been trying not to be wasteful but grateful, I decided to dive into my stash to create something beautiful and sweet. To give myself a bit of challenge, I decided to design a piece using only local fibers from Yampa Valley Fiberworks. Thankfully, a great stash of beautiful fibers have been reserved, just for this project! I have designed and made, both youth and adult sizes. The mittens do not use much yarn, so I hope you can use some of your leftovers and/or fibers from your stash. Feel free to change and play with colors. I find that it is best to use worsted weight yarn that is not too heavy: blend of fibers (alpaca, silk, bamboo, mohair with wool). They are really fun to knit! Make a pair for yourself, give a pair away…. whatever you do, be sure to take a picture and share your project with me!
Happy Knitting!
Materials-

Yampa Valley Fiberworks Worsted Yarn (Mixed fibers - alpaca and wool)
Yarn: Yampa Valley Fiberworks worsted weight in four colors.
Yardage requirements: MC (white) – less than 200 yards; CC1 (rusty red) – less than 100 yards; CC2 (sky blue) – less than 75 yards; CC3 (Green) – less than 25 yards.
Needle: US3/3.25mm double-points
Other: a darning/tapestry needle
Finished size-
Approximately 19” in height for adult and 18” for youth fingerless mittens.

Sweet Cassie Fingerless Mitts (youth and adult sizes)
Abbreviations-
K = knit
P = purl
MC = main color
CC1 = contrast color 1
CC2 = contrast color 2
CC3 = contrast color 3
K2tog = knit 2 together
YO = yarn over
M1L = make 1 left (with left needle pick up the strand between two stitches from front to back, knit the stitch; one leaning left stitch increased)
M1R = make 1 right (with left needle pick up the strand between two stitches from back to front, knit the stitch; one leaning right stitch increased)
Rnds = rounds
Sts = stitches
PM = place marker
SM = slip marker
RM = remove marker
BO = bind off
CO= Cast on

Pattern-
Cast on 40 stitches using long-tail method. Join in the round, be careful not to twist.
Knit 5 rounds.
Next round: * K2tog, yo *, repeat * * till end of round.
Knit 5 rounds.
Cuff: Fold at the k2tog, yo round and knit the cast on edge and the live stiches together.
Knit 1 round.

Begin colorwork:
Round 1: * K1MC, K1CC3 *, repeat * * till end of round.
Round 2: Using CC3, knit all sts.
Round 3: * K1MC, K1CC3 *, repeat * * till end of round. Cut CC3.
Round 4: K1MC, K1CC2, * K3MC, K1CC2 *, repeat * * till end of round.
Round 5: K4MC, * K1CC2, K1MC, K1CC2, K5MC *, repeat * * till 4 sts. Left, K1CC2, K1MC, K1CC2, K1MC.
Round 6: K1MC, K1CC1, * K3MC, K1CC2, K3MC, K1CC1 *, repeat * * 3 more times, K3MC, K1CC2, K2MC.
Round 7: * K3CC1, K5MC *, repeat * * till end of round.

Purl 1 with MC provides a nice effect in the center of the flower
Round 8: K1CC1, P1MC, K2CC1, * K3MC, K2CC1, P1MC, K2CC1 *, repeat * * till last 4 sts., K3MC, K1CC1.
Round 9: * K3CC1, K5MC *, repeat * * till end of round.
Round 10: K1MC, K1CC1, * K3MC, K1CC1 *, repeat till last 2 sts., K2MC.
Round 11: K4MC, K3CC1, * K5MC, K3CC1 *, repeat * * till last sts., K!MC.
Round 12: * K1MC, K1CC2, K1MC, K2CC1, P1MC, K2CC1 *, repeat * * till end of round.
Round 13: * K1CC2, K1MC, K1CC2, K1MC, K3CC1, K1MC *, repeat * * till end of round.
Round 14 (increase round): K1MC, K1CC2, K3MC, K1CC1, K3MC, K1CC2, K3MC, K1CC1, K1MC, PM, M1L, K2MC, K1CC2, K3MC, K1CC1, K3MC, M1R, PM, K1CC2, K3MC, K1CC1, K3MC, K1CC2, K3MC, K1CC1, K2MC (42 stitches total; 2 stitches increased).
Round 15: Using MC, knit all sts.
Round 16: K1MC, K1CC1, * K3MC, K1CC2, *, K3MC, K1CC1, repeat * * 1 time, K1MC, SM, K3MC, K1CC1, repeat * * 1 time, K4MC, SM, K1CC1, repeat * * 1 time, K3MC, K1CC1, repeat * * 1 time, K2MC.
Round 17: * K3CC1, K1MC, K1CC2, K1MC, K1CC2 *, K1MC, repeat * * 1 time, SM, K2MC, repeat * * 1 time, K2MC, repeat * * 2 times slipping marker as you knit, K1MC.
Round 18: K1CC1, P1MC, * K2CC1, K1MC, K1CC2, K1MC *, K2CC1, P1MC, repeat * * 1 time, SM, K1MC, K2CC1, P1MC, repeat * * 1 time, K1MC, K2CC1, SM, P1MC, repeat * * 2 times, K1CC1.
Round 19: * K3CC1, K5MC *, K3CC1, K4MC, SM, K2MC, repeat * * 1 time, K1MC, repeat * * 2 times, slipping market as you knit to the end of round.
Round 20: K1MC, * K1CC1, K3MC *, repeat * * 3 times slipping market as you knit, K1MC, repeat * * 2 times, K1MC, SM, repeat * * 3 times, K1CC1, K2MC.
Round 21 (increase round): K4MC, * K3CC1, K5MC *, K3CC1, SM, M1L, K6MC, K3CC1, K3MC, M1R, SM, K3MC, repeat * * 1 time, K3CC1, K1MC (44 sts. total; 2 stitches increased).
Round 22: * K1MC, K1CC2, K1MC, K2CC1, P1MC, K2CC1 *, repeat * * 1 time slipping marker as you knit, K2MC, repeat * * 1 time, K2MC, repeat * * 2 times slipping marker as you knit to the end of round.
Round 23: K1CC2, K1MC, K1CC2, K1MC, K3CC1, K1MC, repeat * * 1 time slipping marker, K2MC, repeat * * 1 time, K2MC, repeat * * 2 times slipping marker as you knit to the end of round.
Round 24: K1MC, * K1CC2, K3MC, K1CC1, K3MC *, repeat * * 1 time, K2MC, repeat * * 1 time, K2MC, SM, repeat * * 1 time, K1CC2, K3MC, K1CC1, K2MC.
Round 25: Using MC, knit all stitches.
Round 26: K1MC, * K1CC1, K3MC, K1CC2, K3MC *, repeat * * 1 time slipping marker, K2MC, repeat * * 1 time, K2MC, SM, repeat * * 1 time, K1CC1, K3MC, K1CC2, K2MC.
Round 27: * K3CC1, K1MC, K1CC2, K1MC, K1CC2, K1MC *, repeat * * 1 time slipping marker, K2MC, repeat * * 1 time, K2MC, repeat * * 2 times slipping marker as you knit to the end of round.
Round 28 (increase round): K1CC1, P1MC, * K2CC1, K1MC, K1CC2, K1MC *, K2CC1, P1MC, K2CC1, repeat * * 1 time, SM, M1L, K2MC, K2CC1, P1MC, repeat * * 1 time, K3MC, K1CC1, M1R CC1, SM, P1MC, repeat * * 1 time, K2CC1, P1MC, repeat * * 1 time, K1CC1 (46 sts. total; 2 stitches increased).
Round 29: * K3CC1, K5MC *, repeat * * repeat * * 1 time slipping marker, K3MC, repeat * * 1 time, K3MC, repeat * * 2 times slipping marker as you knit to end of round.
Round 30: K1MC, * K1CC1, K3MC *, repeat * * 3 times slipping marker, K3MC, repeat * * 2 times, K3MC, SM, repeat * * 3 times, K1CC1, K2MC.
Round 31: K4MC, K3CC1, * K5MC, K3CC1 *, SM, K8MC, repeat * * 1 time, SM, K3MC, K3CC1, repeat * * 1 time, K1MC.
Round 32: * K1MC, K1CC2, K1MC, K2CC1, P1MC, K2CC1 *, repeat * * 1 time slipping marker, K3MC, repeat * * 1 time, K3MC, repeat * * 2 times slipping marker as you knit to end of round.
Round 33: * K1CC2, K1MC, K1CC2, K1MC, K3CC1 *, K1MC, repeat * * 1 time, SM, K4MC, repeat * * 1 time, K4MC, repeat * * 1 time, K1MC, repeat * * 1 time, K1MC.
Round 34: K1MC, * K1CC2, K3MC, K1CC1, K3MC *, repeat * * 1 time slipping marker, K3MC, repeat * * 1 time, K3MC, SM, repeat * * 1 time, K1CC2, K3MC, K1CC1, K2MC.
Round 35 (increase round): Using MC, knit all sts. increasing M1L after slipping the first marker and M1R before slipping the second marker (48 sts. total; 2 sts. increased). Cut CC1 and CC2.
Continue to round 46 for youth fingerless mitts.
Round 36: K1MC, * K1CC1, K3MC, K1CC2, K3MC *, repeat * * 1 time slipping marker, K4MC, repeat * * 1 time, K4MC, SM, repeat * * 1 time, K1CC1, K3MC, K1CC2, K2MC.
Round 37: * K3CC1, K1MC, K1CC2, K1MC, K1CC2, K1MC *, repeat * * 1 time slipping marker, K4MC, repeat * * 1 time, K4MC, repeat * * 2 times slipping marker as you knit to end of round.
Round 38: K1CC1, P1MC, K2CC1, * K1MC, K1CC2, K1MC, K2CC1, P1MC, K2CC1, K1MC, K1CC2, K1MC, SM, K4MC, K2CC1, P1MC, K2CC1, K1MC, K1CC2, K5MC, K2CC1, SM, P1MC, K2CC1, repeat * * 1 time, K1MC, K1CC2, K1MC, K1CC1.
Round 39: * K3CC1, K5MC *, repeat * * 1 time slipping marker, K4MC, repeat * * 1 time, K4MC, repeat * * 2 times slipping marker as you knit to end of round.
Round 40: K1MC, * K1CC1, K3MC *, repeat * * 3 times slipping marker, K4MC, repeat * * 3 times, SM, repeat * * 3 times, K1CC1, K2MC.
Round 41: K4MC, * K3CC, K5MC *, repeat * * 1 time, SM, K4MC, repeat * * 1 time, K1MC, SM, K3MC, repeat * * 1 time, K3CC1, K1MC.
Round 42 (increase round): * K1MC, K1CC2, K1MC, K2CC1, P1MC, K2CC1 *, repeat * * 1 time slipping marker and M1L with CC1, K4MC, repeat * * 1 time, K4MC, repeat * * 2 times M1R before slipping second marker (50 sts. total; 2 sts. increased).
Round 43: * K1CC2, K1MC, K1CC2, K1MC, K3CC1, K1MC, repeat * * 1 time slipping marker, K5MC, repeat * * 1 time, K5MC, repeat * * 2 times slipping marker as you knit to end of round.
Round 44: K1MC, * K1CC2, K3MC, K1CC1, K3MC, repeat * * 1 time slipping marker, K5MC, SM, repeat * * 1 time, K1CC2, K3MC, K1CC1, K2MC. Cut CC1 and CC2.
Round 45: Using MC, knit all sts.
Round 46: * K1MC, K1CC3 *, repeat * * till end of round (50 sts. for adult; 48 sts. for youth)
Round 47: Using CC3, knit all sts. (50, 48).
Round 48: * K1MC, K1CC3 *, repeat * * till end of round (50, 48). Cut CC3.
Work all remaining rounds in MC.
Round 49: Knit all sts. (50, 48).
Round 50: K to first marker, rm, K (4, 5), b/o 10 sts., knit till second marker, rm, K till end of round (40, 38).
Round 51: K all sts. (40, 38).
Round 52: P all sts. (40, 38)
Round 53: K all sts. (40, 38)
Repeat rounds 52 and 53, 2 more times. Bind off knit wise.
Block lightly. Enjoy your mittens and text away…

Thanks for your support. Happy Knitting!
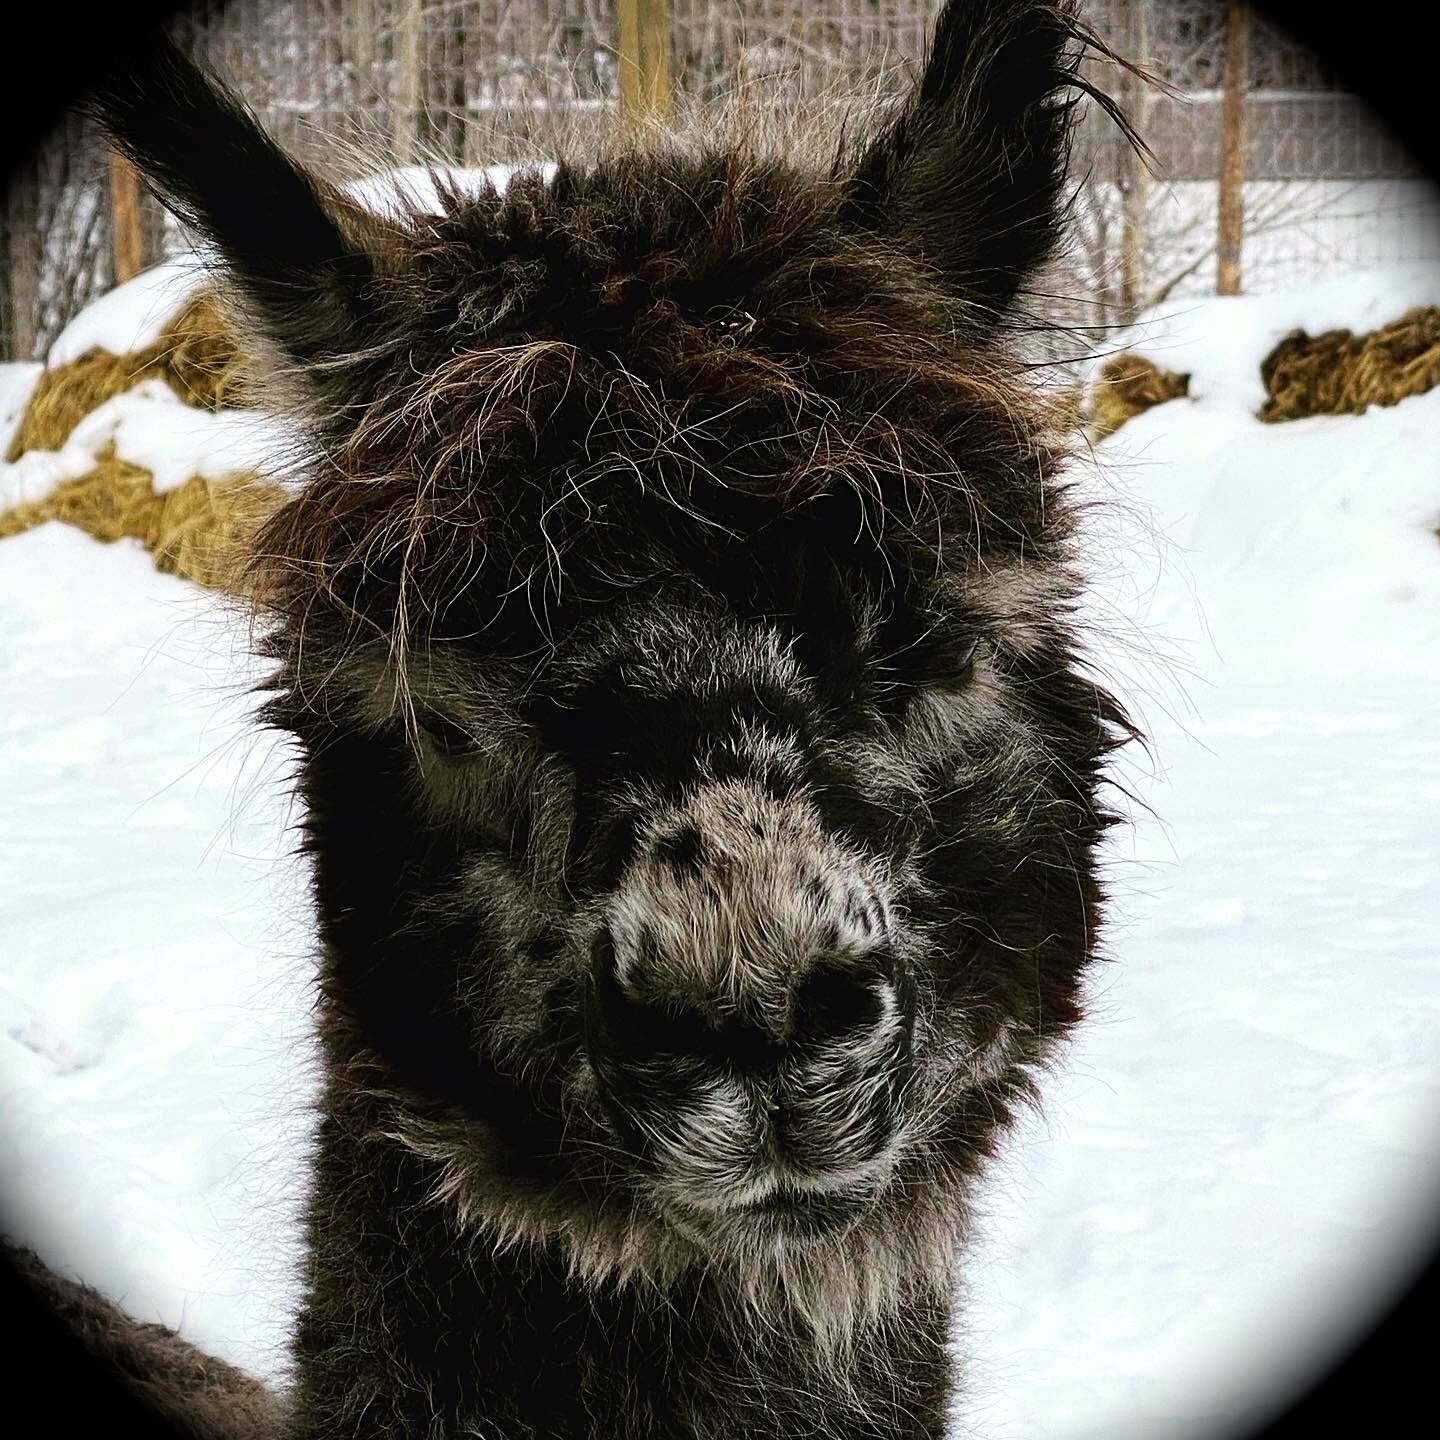
Cardigan from Mork

Mork
Who would ever thought I would be living on a farm and ranch one day with camelids and other livestock! Wait, what was that? In the past year, I have been having so much fun explaining to my family and friends what is the camelidae family. To me, it’s Mork, Zirkle, Snowball, and Bianchi. And also there is Bella! Tim and I were a bit nervous (at first) to take ownership of a fiber family of ten: two ewes (Amelia and Emily); their lambs (Olivia and Daisy from Amelia and Shaun from Emily); four alpacas, old timers as their Ma Ma Peggy, who gave them to us call it (Mork, Zirkle, Snowball and Bianchi); and a llama (Bella). A little bit of reading and some help + support from our farming fiber friends have our new fiber family happy and healthy. And now, the best thing I have been waiting for- my own sheep and alpaca wool!!!

Mork 2019: 70% Alpaca, 30% Merino Wool
Just about a month ago, I came home with some processed fibers from my beauties! Thanks to my friends Lorrae and Lewis Moon at Yampa Valley Fiberworks. From year 2019, we were able to process some (70% alpaca and 30% wool) yarn from Mork, Snowball, and Bianchi. Since Zirkle’s fiber is short according to my friend Lorrae, I have his as roving to be spun into yarn. Not to worry, I will share my experience and projects with you.

Snowday Cardigan for Rowan by Martin Storey
Well, let me tell you what Mork gave me! We were able to get 840 yards of beautiful grey fiber from the handsome fella. I was super excited to work with the fiber that it took me more time to select a pattern than to actually knitting it. Of course, designing my own pattern came to mind but the thought of being unsuccessful was unbearable. After spending way too much time (probably about two weeks or more), I found ‘the’ pattern! Snowland Cardigan for Rowan by a very talent English designer, Martin Storey. This pattern is free and uses just 800 yards! This means I will have leftovers from Mork. PERFECT!


Fast forward… and the cardigan is done! Yes!: in less than the amount of time I spent on finding the pattern. But, what about the buttons?!?! Mork has given me a nice and beautiful cardigan but I don’t have any idea what buttons will deserve such apiece. Think handmade, think of something very special, think tradition, think English, think old…. and voila! Dorset buttons! I will share with you how I make the buttons later but this is the tutorial, that I used which spoke to me. I have taken a live Dorset button class at Interweave Yarn Fest in 2018. So if you are trying to make a button and not getting it the first few times, please do not be hard on yourself! Just keep trying. It took me several tries and I struggled a lot in the beginning because I am left handed.
For the cardigan, I made the traditional Dorset with white yarn to compliment the snowflake pattern. I tried keeping the traditional English theme. If you are wondering why my piece looks a little different from the original, it is because I modified the pattern just so I could have more buttons. The whole experience was amazing! With the cardigan completed, I think I am going to be making more Dorset buttons.


Everyday, I am very thankful to have the opportunity to be doing what I love. I truly enjoy the process of taking care of our animals, having my fiber friends who give me much inspirations and support and being able to make precious handmade items. I appreciate my family and friends who provide me with tremendous support no one can ever asked for! I hope to be creating more because of you! For now, I give you love and distance hugs from our farm in the Routt County, Colorado.
Please stay healthy and always be playful! Happy crafting!

Hugs & Kisses XOXO Hat
In an honor of International Women’s Day, here is Hugs & Kisses XOXO hat pattern
Hugs & Kisses (XOXO) Hat
In celebration of International Women's Day 2020
by Cho Tin Tun Kirkpatrick

Hugs & Kisses XOXO Hat
The Hugs & Kisses XOXO cabled pattern knitted hat has been created in celebration of the International Women's Day 2020. I designed this hat pattern to represent not only 'women' around the world but also 'us', 'humanity'! Hugs & Kisses has a pussy hat inspired design with an XOXO cable pattern repeat. This hat can be knitted-in-the-round or flat using one or two colors. We come from various parts of the world in different shapes and forms. Knit this Hugs & Kisses XOXO hat in the way you want and customize it to be your own!
Yarn: Worsted weight (I have used various fibers in different blends. All works well with different strengths and weaknesses. If you feel the project is tight when making cable stitches, just go a needle size up. Don't stress as I have done this myself. The main goal of this project to create your own unique piece. You are the only one who could do that!)
Needle: US 8 or 5.0mm works best with worsted yarn. However, if your cable stitch tension is tight, feel free to use a needle that is one size bigger. After all, everyone knits on a different tension and guage depending on the moment!
Others: A stitch marker and darning needle

Abbreviations:
ktbl = knit to back loop
k = knit
p = purl
c4b = cable 4 back
c4f = cable 4 front
Pattern repeats:
2x2 Rib - *ktbl 2, p 2*, repeat * * until the end. You may use the knit stitch to replace ktbl.
XOXO cable pattern repeat is worked 8 stitches over a 16 rounds/rows repeat.
Hugs Kisses XOXO Hat_Flat
Cast on 8 stitches
Row 1 (rs): k8
Row 2 (ws): p8
Row 3 (rs): c4b, c4f
Row 4 (ws): p8
Row 5 (rs): k8
Row 6 (ws): p8
Row 7 (rs): c4b, c4f
Row 8 (ws): p8
Row 9 (rs): k8
Row 10 (ws): p8
Row 11 (rs): c4f, c4b
Row 12 (ws): p8
Row 13 (rs): k8
Row 14 (ws): p8
Row 15 (rs): c4f, c4b
Row 16 (ws): p8
Hugs & Kisses XOXO Hat_Round
Round 1: k8
Round 2: k8
Round 3: c4b, c4f
Round 4: k8
Round 5: k8
Round 6: k8
Round 7: c4b, c4f
Round 8: k8
Round 9: k8
Round 10: k8
Round 11: c4f, c4b
Round 12: k8
Round 13: k8
Round 14: k8
Round 15: c4f, c4b
Round 16: k8
Hat Pattern:

Cast on 88 stitches using a long-tail method.
Work 2x2 rib for 2 inches. You may change to another color for body of the hat.
Follow the XOXO pattern (flat or round) until the hat reaches desired length, ending on the 4th, 8th, 12th, or the 16th round/row. You may change to another color for the top of the hat. Be aware that you will need more length if the brim of hat is to be folded.
Knit in stockinette for 4 more rounds/rows.
Finishing for Knitting flat:
Bind off all 88 stitches. Sew the sides and top of hat.
Finishing for Knitting-in-the-round:
Place 44 stitches over two US8/5.0mm knitting needles to close the top of XOXO hat.
Kitchener stitch or mattress stitch the top. Weave in ends.
Weave in ends.

Happy Knitting!